Tuesday, May 29, 2012

OpenLDAP Everywhere Revisited

http://www.linuxjournal.com/article/8119


  Samba 3 offers new capabilites for a unified directory for all clients. Get mail, file sharing and more all working together with the latest software.
Many readers have used our December 2002 article, “OpenLDAP Everywhere”, to achieve unified login company-wide. Since then, OpenLDAP and Linux have progressed. Here, we demonstrate the use of OpenLDAP as the core directory service for a mixed environment. The LDAP server provides a shared e-mail directory, login for Linux and Microsoft Windows clients, automount of home directories and file sharing for all clients. A simple mixed environment used in the examples in this article is shown in (Figure 1).
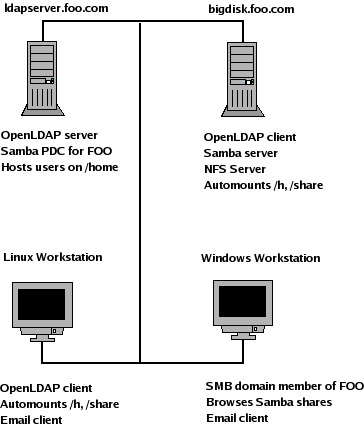
Figure 1. In the mixed environment, both Linux and Windows clients use a common LDAP infrastructure.
LDAP Server Installation and Configuration
The LDAP server we discuss was installed using RPM binary packages and openldap-2.2.13-2 on Fedora Core 3. The nss_ldap package also is required. For the most recent source from openldap.org, see the on-line Resources. Edit the server configuration file, /etc/openldap/slapd.conf, as shown in Listing 1. Lines beginning with whitespace are interpreted as a continuation of the previous line, so it's not necessary to use a backslash at the end of a long line.
The LDAP schema defines object classes and attributes that make up the directory entries. Red Hat's autofs schema fits our needs and was packaged with the RPM installation. If you find that you need to add an objectClass or an attribute to your directory, see the OpenLDAP admin guide.
We use the default database type ldbm. Our example uses the LDAP domain component. So, foo.com becomes dc=foo,dc=com.
The Manager has full write access to LDAP entries. Create the manager's password using /usr/sbin/slappasswd. Paste the encrypted password into the rootpw entry in slapd.conf.
The index lines enhance performance for attributes queried often. Access control restricts access to the userPassword entry. The user and manager may modify the entry. For all other entries, the manager has write access, and everyone else is granted read access.
Create the Directory Structure
Each entry in the directory is identified uniquely with a distinguished name (dn). The dn for foo.com is dn: dc=foo, dc=com. The organizationalUnit (ou) provides a method for grouping entries. The directory structure is shown in Listing 2.
We create the top level entries in LDAP Interchange Format (LDIF) and save them to top.ldif, as shown in Listing 3.

Add the top-level entries to the directory with ldapadd:
ldapadd -x -D 'cn=manager,dc=foo,dc=com' \
-W -f top.ldif


Then, test your work with an ldapsearch command that retrieves all entries:
ldapsearch -x -b 'dc=foo,dc=com'
Share E-Mail Contacts
At this point, we have enough structure in LDAP to put it to real use. We start by sharing our e-mail contacts. To simplify the process, you may be able to export your e-mail address book in LDIF format. For example, in Mozilla Thunderbird, you can export in LDIF from the Tools menu on the Address Book window. You do need to process the resulting file so it looks like our contacts example below. We suggest using Perl for the task.
Contacts are identified uniquely by their e-mail addresses. Here is the dn for a contact:
dn: uid=someone@somewhere.com,ou=contacts,
↪ou=people,dc=foo,dc=com.

With all of the attributes, the full entry for a contact looks like:
dn: uid=someone@somewhere.com,ou=contacts,
↪ou=people,dc=foo,dc=com
mail: someone@somewhere.com
uid: someone@somewhere.com
givenName: Someone
sn: Youknow
cn: Someone Youknow
objectClass: person
objectClass: top
objectClass: inetOrgPerson

Separate each contact entry with a blank line and save it to a file called contacts.ldif. Add the contacts to the directory with ldapadd:
ldapadd -x -D 'cn=manager,dc=foo,dc=com' \
-W -f contacts.ldif


Then, test with an ldapsearch command, as shown above.
Configure E-Mail Clients
Figure 2. To use the company address book, fill in the information on your server in Thunderbird's Directory Server Properties.
Next, we configure Mozilla Thunderbird to use the new LDAP server (Figure 2). From the Tools menu in Thunderbird, select Options. In the Composition tab, select Directory Server, Edit Directories and then Add. Fill in the Directory Server Properties with:
Name: FOO
Server: ldapserver.foo.com
base DN: ou=people,dc=foo,dc=com

In the Advanced tab, increase the number of results returned to fit your directory size. For foo.com, we selected 1,000 results.
Test your settings by composing a message to one of your contacts in your LDAP directory. The address should auto-complete as you type. Another test is to search the LDAP directory from within the Thunderbird Mail Address Book. Search in the FOO address book for “Name or Email contains: *”. That should return all of the contacts entries.
Unified Linux Login with LDAP
By storing user account information in LDAP, you can use the same user name and password at any Linux console. To start, you must decide which user names should be entered in LDAP. Table 1 shows our user scheme for UID/GIDs.
Table 1. User Scheme for UID/GIDs
Type of accountUID
System accountsUID < 500
Samba special accounts499 < UID < 1,000
Unified login accounts999 < UID < 10,000
Local users and groups, not in LDAP> 10,000
This user scheme allows for 9,000 LDAP unified login entries, while also allowing local users and groups that do not interfere with LDAP UIDs and GIDs. The user scheme also allows for the accounts required by the Samba Primary Domain Controller.

Create LDAP User Login Entries
A user login entry is identified by the login name as uid. Login users are members of ou=people, resulting in this dn:
dn: uid=gomerp,ou=people,dc=foo,dc=com

The full entry contains attributes that are needed to control account access, as shown in Listing 4. The full entry also includes attributes needed by the Samba configuration that is discussed below.
OpenLDAP ships with migration utilities that can extract the user account information; see /usr/share/openldap/migration. To convert an existing /etc/passwd file to LDIF, start by checking migrate_common.ph. Edit the file to include your domain name, default base and enable extended schema:
# Default DNS domain
$DEFAULT_MAIL_DOMAIN = "foo.com";

# Default base
$DEFAULT_BASE = "dc=foo,dc=com";

# turn this on to support more general object classes
# such as person.
$EXTENDED_SCHEMA = 1;

Extract the user account information from /etc/passwd:
/usr/share/openldap/migration/migrate_passwd.pl \
/etc/passwd > people.ldif


Review the resulting LDIF file. You should remove entries for system accounts such as root and for local users' private groups that do not need to appear in LDAP.
Add the user entries to LDAP and test with an ldapsearch command, as discussed above:
ldapadd -x -D 'cn=manager,dc=foo,dc=com' -W \
-f people.ldif


Because the login users belong to ou=people, you now may look up their e-mail addresses within your e-mail client.
Create Group Entries
You need to make a group entry for each group to be shared between multiple Linux computers. Each user also needs a group entry for the user private group. A group entry is identified by cn, and each group belongs to ou=Groups. For example:
dn: cn=gomerp,ou=Groups,dc=foo,dc=com

A user private group would look like this:
dn: cn=gomerp,ou=Groups,dc=foo,dc=com
objectclass: posixGroup
objectclass: top
cn: gomerp
userPassword: {crypt}x
gidNumber: 5223

A shared group would look like:
dn: cn=web_dev,ou=Groups,dc=foo,dc=com
objectclass: posixGroup
objectclass: top
cn: web_dev
gidNumber: 5019
memberUid: gomerp
memberUid: goober
memberUid: barneyf

Extract the group information from /etc/group:
/usr/share/openldap/migration/migrate_passwd.pl \
/etc/group > group.ldif


Review the resulting LDIF file. You should remove entries for system groups and for local system users that do not need to appear in LDAP.
Add the group entries to LDAP and test with an ldapsearch command:
ldapadd -x -D 'cn=manager,dc=foo,dc=com' -W \
-f group.ldif

Configure Automount to Share Home Directories and NFS Shares
With unified login, users have a single home directory that is shared by way of the Network File System (NFS). We host our home directories from ldapserver.foo.com and share /home, but the file server and OpenLDAP do not need to run on the same machine. Details on NFS are outside the scope of this article, but here is the line from /etc/exports that works to export home directories:
/home *.foo.com(rw)

Linux LDAP clients mount the user's home directory at login, using automount and NFS. The LDAP use of automount is a replacement for NIS (network information service) automount maps. Replace the automount maps for auto.master, auto.home and auto.misc. To do so, we create a new organizational unit for auto.master:
dn: ou=auto.master,dc=foo,dc=com
objectClass: top
objectClass: automountMap
ou: auto.master

An auto.master entry is identified by cn. The automountInformation attribute instructs automount to look for the map in LDAP:
dn: cn=/h,ou=auto.master,dc=foo,dc=com
objectClass: automount
automountInformation: ldap:ou=auto.home,dc=foo,dc=com
cn: /h

While we're at it, let's create an auto.master entry for other NFS shared directories:
dn: cn=/share,ou=auto.master,dc=foo,dc=com
objectClass: automount
automountInformation: ldap:ou=auto.misc,dc=foo,dc=com
cn: /share

Create the automount entries in LDIF format, save as auto.master.ldif and add the entries to LDAP:
ldapadd -x -D 'cn=manager,dc=foo,dc=com' -W -f auto.master.ldif

Next, we create a new organizational unit for auto.home:
dn:ou=auto.home,dc=foo,dc=com
objectClass: top
objectClass: automountMap
ou: auto.home

A home directory entry is identified by cn:
dn: cn=gomerp,ou=auto.home,dc=foo,dc=com
objectClass: automount
automountInformation: ldapserver.foo.com:/home/gomerp
cn: gomerp

Create auto.home entries for each user in ldif format, save as auto.home.ldif and add the entries to LDAP:
ldapadd -x -D 'cn=manager,dc=foo,dc=com' -W \
-f auto.home.ldif


When automounted from a Linux LDAP client, your home directory, ldapserver.foo.com:/home/gomerp, is mounted on /h/gomerp. Other NFS shares may be entered in LDAP and automounted as needed. The auto.misc organizational unit holds these automount maps, which have the form ou=auto.misc.
We've already created an auto.master entry for /share, as shown above. Now, we create the ou=auto.misc entry:
dn:ou=auto.misc,dc=foo,dc=com
ou: auto.misc
objectClass: top
objectClass: automountMap

Create entries for the NFS shares under ou=auto.misc:
dn:cn=redhat,ou=auto.misc,dc=foo,dc=com
objectClass: automount
automountInformation: bigdisk.foo.com:/pub/redhat
cn: redhat

dn:cn=engineering,ou=auto.misc,dc=foo,dc=com
objectClass: automount
automountInformation: bigdisk.foo.com:/data/engineering
cn: engineering

Save the entries as auto.misc.ldif and add the entries to LDAP:
ldapadd -x -D 'cn=manager,dc=foo,dc=com' -W -f auto.misc.ldif 
When automounted from a Linux LDAP client, your shared directory bigdisk.foo.com:/data/engineering is mounted on /share/engineering.

Configure the Linux LDAP Client
To begin configuring the Linux LDAP client, you need to install the name switch service package, nss_ldap. The Red Hat tool /usr/bin/authconfig is handy for configuring the client. Select Use LDAP and fill in the fields so that they read Server: ldapserver.foo.com and Base DN: dc=foo,dc=com. Authconfig writes to these files: /etc/ldap.conf, /etc/openldap/ldap.conf and /etc/nsswitch.conf.
Verify that /etc/nsswitch.conf has the following entries:
passwd:     files ldap
shadow: files ldap
group: files ldap
automount: files ldap

Verify that /etc/ldap.conf has these entries:
host ldapserver.foo.com
base dc=foo,dc=com

Verify that /etc/openldap/ldap.conf has these entries:
HOST ldapserver.foo.com
BASE dc=foo,dc=com
Final Linux Server Configuration
The user's password and group entries must be removed from the password and group files on the NFS server where home directories live. Create backups and then edit /etc/passwd, /etc/shadow, /etc/group and /etc/gshadow to remove the LDAP real people entries. In our case, /etc/passwd should have no accounts left with a UID from 1000 to 9999.
To test, log in to a Linux LDAP client using an LDAP user name. You should see the appropriate login shell and home directory for the user. To test auto.misc shares, you must access the share by name, for example:
cd /share/redhat

Automount only mounts NFS shares as they are used, so the directory /share/redhat is not visible until it has been accessed.
Achieve Unified Login with Samba and LDAP
The main purpose of using Samba and LDAP together is to achieve unified login for Microsoft Windows clients. What this means to your organization is a user will be able to log on to your network from any workstation and have access to all shared folders, files and printers.
The first step to unified login starts by configuring Samba as a primary domain controller (PDC). The full configuration details on how to set up Samba as your PDC are outside the scope of this article. Please visit the Idealx Web site for a great HOWTO (see Resources). The folks at Idealx have made great contributions to the Samba Project, and you should become familiar with their tools if you plan on using Samba.
Assuming you already have experience with setting up Samba domain controllers, this Samba configuration file should get you up and running with our directory example in the article (Listing 5). The full file is available from the Linux Journal FTP site (see Resources).
The remaining piece of the puzzle involves setting up LDAP to take advantage of Samba's advancements made in the past couple of years. This should be similar to the LDAP setup above, but with updated features added in for Samba. With the new Samba 3 version, we now are able to store all Samba account information inside the LDAP directory. This is beneficial because now all the information is stored in a centralized location.
Samba LDAP Setup
One difference in the LDAP/Samba combination setup is the additional accounts and LDAP entries that need to be populated for the two to work together. Several well-known Windows domain user accounts and domain group accounts are required for your unified login server to function. Special LDAP OU entries also are required for the server to store domain account information. Fortunately, a script called smbldap-populate is available that does all of this for you. This script is part of the Idealx smbldap-tools package that can aid you in setting up both your PDC and your Samba Enabled LDAP directory. Listing 6 is sample output of what you should see when you run the smbldap-populate script.

If you examine the sample output of this populate script, you should notice that it has added several new users, groups and OUs to the directory. For example, the script adds the well-known Domain Admins and Domain Users groups to the directory. The NT-based versions of Microsoft Windows all are preconfigured with specific user and group entries. Each one of those has a relative identifier (RID) associated with it. What this means to LDAP is the corresponding LDAP user or group entry must be assigned to the respective RID of the Windows user or group. Using the smbldap-populate script takes care of making the relation for you. The well-known user and groups RIDs that are required are:
Name          RID
-----------------
Domain Admins 512
Domain Users 513
Domain Guests 514

Aside from the new user and group entries, several new OU entries can provide further domain functionality. The first of these is ou=Computers, which is used to store all machine accounts for member servers and workstations on the domain. Second, the ou=Idmap is used if Samba is being used as a domain member server of a Windows server controlled domain. The last new entry is ou=NextFreeUnixId. This entry is used to defined the next UID and GID available for creating new users and groups.
Managing Your Directory
After your LDAP directory is populated and Samba is set up correctly, you are ready to start adding users and groups to populate your directory. The Idealx command-line utilities can take care of this job nicely for you. Some PHP-based directory managers are available that can be useful here as well. Consider using phpLDAPadmin and/or the LDAP Account Manager (LAM) to take on this task. Both are helpful, providing a graphical view of your directory. Each also provides the ability to view and edit LDAP entries in a user-friendly graphical environment (Figure 3). The LDAP browser, which is Java-based, is another option for viewing and editing your directory.
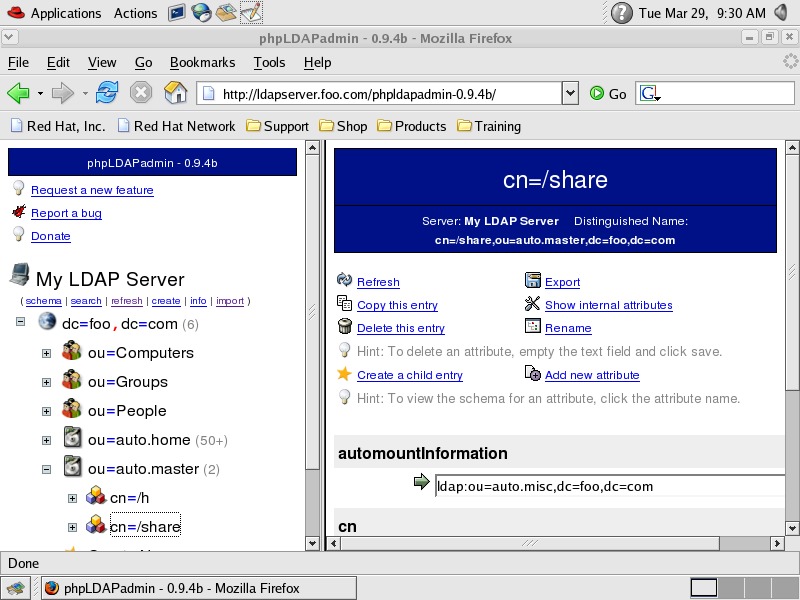
Figure 3. Get a Web view of your directory with phpLDAPadmin.
Since the December 2002 article, we have seen much improvement in Samba with the 3.x releases. Moving to the new version should mean greater control over accounts and improved group mapping functionality, thus giving you greater control over your domain.
Maintenance
We strongly suggest that you use simple authentication and security layer (SASL) and transport layer security (TLS) to secure your new LDAP directory. See Resources for details.
Congratulations! Your LDAP server is up and running with shared e-mail contacts, unified login and shared file storage that is accessible from any client. 

OpenLDAP Everywhere

http://www.linuxjournal.com/article/6266


The purpose of this article is to demonstrate the use of OpenLDAP as the core directory service for a heterogeneous environment. The LDAP server provides a shared e-mail directory, a unified login for Linux and Windows users, automount of home directories and file sharing for both Linux and Windows clients.
Midwest Tool & Die has been using OpenLDAP for three years, and the performance has been flawless. We have experienced 100% uptime for the directory. The company saw the first big benefit from sharing e-mail contacts in the directory. Now, we have unified logon from any networked computer. Our computer users can access the same file storage through Windows/Samba or through Linux/NFS/automount. The result is seamless access to network services.

Figure 1. OpenLDAP Mixed Environment

A simple mixed environment used in the examples in this article is shown in Figure 1. The configuration discussed in this article does not document the use of SSL. The ldapsync.pl program it uses may expose your LDAP manager password. As a result, Windows clients may cache user passwords, thereby creating a new risk to Linux security. Review your security needs with caution and prudence, and attempt this configuration at your own risk. Neither the authors, nor our employer, Midwest Tool & Die, takes any responsibility for your security.
LDAP Server Installation and Configuration
The LDAP server we discuss was installed using RPM binary packages and uses openldap-2.0.11-8 on Red Hat 7.1. You also need to have the auth_ldap and nss_ldap packages. This article assumes a domain name of foo.com.
To use the most recent source, follow the instructions at www.openldap.org/doc/admin/quickstart.htmlto download and install OpenLDAP. Edit the OpenLDAP server configuration file, /etc/openldap/slapd.conf as follows:
# Schemas to use
include /etc/openldap/schema/core.schema
include /etc/openldap/schema/cosine.schema
include /etc/openldap/schema/inetorgperson.schema
include /etc/openldap/schema/nis.schema
include /etc/openldap/schema/redhat/
rfc822-MailMember.schema
include /etc/openldap/schema/redhat/autofs.schema
include /etc/openldap/schema/redhat/
kerberosobject.schema
database ldbm
suffix "dc=foo,dc=com"
rootdn "cn=Manager, dc=foo,dc=com"
rootpw {crypt}sadtCr0CILzv2
directory /var/lib/ldap
index default eq
index objectClass,uid,uidNumber,gidNumber eq
index cn,mail,surname,givenname eq,sub
# Access Control (See openldap v.2.0 Admin Guide)
access to attr=userPassword
by self write
by anonymous auth
by dn="cn=manager,dc=foo,dc=com" write
by * compare
access to *
by self write
by dn="cn=manager,dc=foo,dc=com" write
by * read
The LDAP schemas define object classes and attributes that make up the directory entries. With the edits above, the hard work of defining schemas to fit our uses has been done. The schemas that we need, listed in the first section of slapd.conf, already have been defined and packaged with the RPM installation.
If you find that you need to add an objectClass or an attribute for your directory, see the OpenLDAP admin guide at www.openldap.org/doc/admin20/schema.html. We'll use the default database type ldbm, and our example uses the LDAP domain component. Therefore, foo.com becomes dc=foo,dc=com. In addition, the manager has full write access to LDAP entries.
The Red Hat 7.3 Reference Guide suggests using crypt to protect the manager's password:
perl -e "print crypt('passwd',
'salt_string',);"
In the previous Perl line, replace salt_string with a two-character salt, and passwd with the plain-text version of the password. Paste the resulting encrypted password into slapd.conf as shown above.
The index lines enhance performance for attributes that are often queried. Access control restricts access to the userPassword entry, but the user and manager may modify the entry. For all other entries, the manager has write access, and everyone else is granted read access.


Create the Directory Structure
LDAP can be seen as a tree, with foo.com at the trunk. Branches are created as organizational units (ou), as shown in Figure 2.
Figure 2. Organizational units are branches on the LDAP tree.
Each entry in the directory is uniquely identified with a distinguished name (dn). The dn for the LDAP manager looks like dn: cn=manager, dc=foo, dc=com.
The ou provides a method for grouping entries, as shown in Table 1.
Table 1. ou Method for Grouping Entries
We create the individual entries in LDIF (LDAP Interchange Format) and save them to top.ldif:
dn: dc=foo, dc=com
objectclass: dcObject
objectclass: organization
o: Foo Company
dc: foo
dn: cn=manager, dc=foo, dc=com
objectclass: organizationalRole
cn: manager
dn: ou=people, dc=foo, dc=com
ou: people
objectclass: organizationalUnit
objectclass: domainRelatedObject
associatedDomain: foo.com
dn: ou=contacts, ou=people, dc=foo, dc=com
ou: contacts
ou: people
objectclass: organizationalUnit
objectclass: domainRelatedObject
associatedDomain: foo.com
dn: ou=group, dc=foo, dc=com
ou: group
objectclass: organizationalUnit
objectclass: domainRelatedObject
Add the top-level entries to the directory with ldapadd:
ldapadd -x -D 'cn=manager,dc=foo,dc=com' -W \
-f top.ldif
Then, test your work with ldapsearch to retrieve all entries:
ldapsearch -x -b 'dc=foo,dc=com'
Share E-Mail Contacts
At this point, we have enough structure in LDAP to put it to real use. We'll start by sharing our e-mail contacts, which also should be in LDIF.
To simplify the process, you may be able to export your e-mail address book in LDIF. For example, in Mozilla 1.0, you can export in LDIF from the Tools menu on the address book window. Microsoft Outlook Express also allows exporting the address book in LDIF. You will need to process the resulting file so it looks like our contacts example below; I suggest using Perl for the task.
Contacts are uniquely identified by their e-mail addresses. Here is the dn for a sample contact:
dn: uid=someone@somewhere.com,ou=contacts,
ou=people, dc=foo,dc=com
With all of the attributes, the full entry for a contact looks like:
dn: uid=someone@somewhere.com,ou=contacts,
ou=people, dc=foo,dc=com
cn: Someone Youknow
mail:
uid:
givenname: Someone
sn: Youknow
objectclass: person
objectClass: top
objectClass: inetOrgPerson
Separate each contact entry with a blank line, and save it to a file called contacts.ldif. Then you can add the contacts to the directory with ldapadd:
ldapadd -x -D 'cn=manager,dc=foo,dc=com' -W \
-f contacts.ldif
Once again, test your work with an ldapsearchthat retrieves all entries:
ldapsearch -x -b 'dc=foo,dc=com'
Configure E-Mail Clients
Now it's time to configure Mozilla to use the new LDAP server (see Figure 3).

Figure 3. Directory Server Properties Dialog Box in Mozilla

From the Edit menu in the Mozilla Mail and News window, select Mail & Newsgroup Account Setting. In the Addressing tab, select Use a different LDAP server, then select Edit Directories and then Add. Fill in the Directory Server Properties dialog with:
Name: FOO
Server: ldapserver.foo.com
base DN: ou=people,dc=foo,dc=com
Next, tell Mozilla to look up addresses in your directory. Under Addressing in the Mail and Newsgroups preferences, select Address Autocompletion and fill in FOO for Directory Server.
Test your settings by composing a message to one of your contacts in your LDAP directory. The address should autocomplete as you type. Another test is to search the LDAP directory from within the Mozilla Mail Address Book. A search for Name or E-mail that contains * should return all of the contact entries. Similarly, you can also configure Microsoft Outlook Express to use the LDAP directory.


Unified Linux Login with LDAP
By storing user account information in LDAP, you can use the same user name and password at any Linux console. To start, you must decide which user names should be entered in LDAP. Here is our user scheme for UID/GIDs:
  • System accounts: UID < 500
  • Real people in LDAP: 499 < UID < 10,000
  • Local users, groups (not in LDAP) > 10,000
This user scheme allows for 9,500 LDAP user and group entries, while allowing local per-system users and groups that do not interfere with LDAP UID/GIDs.
Create Local Computer User Entries
An entry for a local computer user is identified by the login name as “uid”. Local computer users are members of ou=people: dn: uid=gomerp,ou=people,dc=foo,dc=com.
The full entry contains the attributes needed to control account access:
dn: uid=gomerp,ou=people,dc=foo,dc=com
uid: gomerp
cn: Gomer Pyle
givenname: Gomer
sn: Pyle
mail:
objectClass: person
objectClass: organizationalPerson
objectClass: inetOrgPerson
objectClass: account
objectClass: posixAccount
objectClass: top
objectClass: kerberosSecurityObject
objectClass: shadowAccount
userPassword: useradd_ldap_flag
shadowLastChange: 11547
shadowMax: 99999
shadowFlag: 0
krbname:
loginShell: /bin/bash
uidNumber: 531
gidNumber: 531
homeDirectory: /h/gomerp
gecos: Gomer Pyle
To make this easier, OpenLDAP ships with migration utilities that can extract the user account information; see /usr/share/openldap/migration. The first thing you need to do is edit migrate_common.ph:
# Default DNS domain
$DEFAULT_MAIL_DOMAIN = "foo.com";
# Default base
$DEFAULT_BASE = "dc=foo,dc=com";
# turn this on to support more general object classes
# such as person.
$EXTENDED_SCHEMA = 1;
Then, extract the user account information:
/usr/share/openldap/migration/migrate_passwd.pl \
/etc/passwod >people.ldif
Once this is done, review the resulting LDIF file. You should remove entries for system accounts such as root and for local system users that do not need to appear in LDAP. Finally, add the user entries to LDAP:
ldapadd -x -D 'cn=manager,dc=foo,dc=com' -W \
-f people.ldif
As always, test your work with an ldapsearchthat retrieves all entries:
ldapsearch -x -b "dc=foo,dc=com"
"(objectclass=*)"
Because the computer users belong to ou=people, you may now look up their e-mail addresses within your mail client.
Create Group Entries
You need to make a group entry for each group that is shared between multiple Linux computers. Each user also needs a group entry for the user private group. A group entry is identified by “cn”, and each group belongs to ou=group, for example:
dn: cn=gomerp,ou=group,dc=foo,dc=com
A user private group would look like this:
dn: cn=gomerp,ou=group,dc=foo,dc=com
objectClass: posixGroup
objectClass: top
cn: gomerp
userPassword: {crypt}x
gidNumber: 531
While a shared group would look like:
dn: cn=web_dev,ou=group,dc=foo,dc=com
objectClass: posixGroup
objectClass: top
cn: web_dev
gidNumber: 502
memberUid: gomerp
memberUid: goober
memberUid: barneyf
After creating the group entry, extract the group information:
/usr/share/openldap/migration/migrate_passwd.pl \
/etc/group >group.ldif
Review the resulting LDIF file, removing entries for system groups and for local system users that do not need to appear in LDAP. Then, add the group entries to LDAP:
ldapadd -x -D 'cn=manager,dc=foo,dc=com' -W \
-f group.ldif
Test your work with an ldapsearch that retrieves all group entries:
ldapsearch -x -b 'dc=foo,cd=com'
Configure Automount to Share Home Directories (and NFS Shares)
With unified login, users have a single home directory shared via NFS. To keep things simple, we host our home directories from ldapserver.foo.com and share /home via NFS. NFS is outside the scope of this article, but here is a line from /etc/exports that works.
/home *.foo.com(rw)
Linux LDAP clients mount the user's home directory at login, using automount and NFS. The LDAP use of automount is a replacement for NIS (Network Information Service) automount maps. Replace the automount maps for auto.master, auto.home and auto.misc.
We also create a new organizational unit for auto.master:
dn: ou=auto.master,dc=foo,dc=com
objectClass: top
objectClass: automountMap
ou: auto.master
An auto.master entry is identified by “cn”. The automountInformation attribute instructs automount to look for the map in LDAP:
dn: cn=/h, ou=auto.master,dc=foo,dc=com
objectClass: automount
automountInformation: ldap:ou=auto.home,
dc=foo,dc=com
cn: /h
While we're at it, let's create an auto.master entry for other NFS shared directories:
dn: cn=/share, ou=auto.master,dc=foo,dc=com
objectClass: automount
automountInformation: ldap:ou=auto.misc,
dc=foo,dc=com
cn: /share
Create the automount entries in LDIF format and save as auto.master.ldif:
dn: ou=auto.master,dc=foo,dc=com
objectClass: top
objectClass: automountMap
ou: auto.master
dn: cn=/h, ou=auto.master,dc=foo,dc=com
objectClass: automount
automountInformation: ldap:ou=auto.home,
dc=foo,dc=com
cn: /h
dn: cn=/share, ou=auto.master,dc=foo,dc=com
objectClass: automount
automountInformation: ldap:ou=auto.misc,
dc=foo,dc=com
cn: /share
Add the auto.master entries to LDAP:
ldapadd -x -D 'cn=manager,dc=foo,dc=com' -W \
-f auto.master.ldif
Next, we create a new organizational unit for auto.home, ou=auto.home. A home directory entry is identified by “cn”:
dn: cn=gomerp,ou=auto.home,dc=foo,dc=com
Create auto.home entries for each user in LDIF format and save as auto.home.ldif:
dn: ou=auto.home,dc=foo,dc=com
objectClass: top
objectClass: automountMap
ou: auto.home
dn: cn=gomerp,ou=auto.home,dc=foo,dc=com
objectClass: automount
automountInformation:
ldapserver.foo.com:/home/gomerp
cn: super3
Add the auto.home entries to LDAP:
ldapadd -x -D 'cn=manager,dc=foo,dc=com' -W \
-f auto.home.ldif
When automounted from a Linux LDAP client, your home directory (ldapserver.foo.com:/home/gomerp) is mounted on /h/gomerp. Other NFS shares may be entered in LDAP and automounted as they are needed. The auto.misc organizational unit holds these automount maps, which have the form ou=auto.misc.
We've already created an auto.master entry for /share, as indicated above. Now, create entries for NFS shares under auto.misc, and save them as auto.misc.ldif:
dn: ou=auto.misc,dc=foo,dc=com
objectClass: top
objectClass: automountMap
ou: auto.misc
dn: cn=redhat,ou=auto.misc,dc=foo,dc=com
objectClass: automount
automountInformation:
bigdisk.foo.com:/pub/redhat
cn: redhat
dn: cn=engineering,ou=auto.misc,dc=foo,dc=com
objectClass: automount
automountInformation:
bigdisk.foo.com:/data/engineering
cn: engineering
Add the auto.misc entries to LDAP:
ldapadd -x -D 'cn=manager,dc=foo,dc=com' -W \
-f auto.misc.ldif
When automounted from a Linux LDAP client, your shared directory bigdisk.foo.com:/data/engineering is mounted on /share/engineering.

Configure the Linux LDAP Client
You now need to install the authentication package, auth_ldap, and the name switch service package, nss_ldap. The Red Hat tool /usr/bin/authconfig is handy for configuring the client. Select Use LDAP®Server: ldapserver.foo.com, base DN: dc=foo,dc=com. Authconfig writes to these files: /etc/ldap.conf, /etc/openldap/ldap.conf and /etc/nsswitch.conf.
Verify that /etc/nsswitch.conf has the following entries:
passwd:    files ldap
shadow: files
group: files ldap
automount: files ldap
Verify that /etc/ldap.conf has these entries:
host ldapserver.foo.com
base dc=foo,dc=com
and that /etc/openldap/ldap.conf has these entries:
HOST ldapserver.foo.com
BASE dc=foo,dc=com
Final Linux Server Configuration
The LDAP server also is a client of LDAP. On the LDAP server, disable the automount of /home as /h. nsswitch is configured to check the files first, and then LDAP for automount information. So, we will make a dummy entry in ldapserver.foo.com:/etc/auto.master:
/h /etc/auto.null
The user's password and group entries must be removed from the password and group files on the home directory server. Create backups, then edit /etc/passwd, /etc/shadow, /etc/group and /etc/gshadow to remove the LDAP real-people entries.
To test, log in to a Linux LDAP client, using an LDAP user name. You should see the appropriate login shell and home directory for that user. To test auto.misc shares, you must access the share by name:
cd /share/redhat
Automount only mounts NFS shares as they are used, so the directory /share/redhat is not visible until it has been accessed.
Microsoft Windows Unified Login with Samba and LDAP
To have a Windows and Linux unified login, first configure a Samba Primary Domain Controller (PDC). User home directories are shared with SMB clients. The details of Samba configuration are outside the scope of this article.
Configure ldapsync.pl and Samba
User passwords may be changed from MS Windows using Samba and the Perl program ldapsync.pl, which is available from www.mami.net/univr/tng-ldap/howto/#how_to_change_password.
The ldapsync.pl script is a replacement for the /bin/passwd program called by Samba to change users' passwords, and it keeps them in sync with the Samba passwords. The ldapsync.pl script is called from Samba when changing user passwords within Windows, and it is run as root just as /bin/passwd is normally run in an unmodified Samba. The ldapsync.pl script is needed for LDAP-enabled users to function. Because the user passwords are not stored locally in /etc/passwd but in LDAP, the ldapsync.pl script binds to the LDAP directory and modifies the user's password entry in LDAP.
In simpler terms, here's how this process works:
  1. User calls password-changing program from Windows.
  2. User clicks OK to change password and sends data to Samba server.
  3. Samba looks at its config file and knows to call ldapsync.pl to change LDAP passwords.
  4. ldapsync.pl is executed with -o %u options that specify the program to run without prompting for the old password. It passes the user's name to the script as it runs (important if you don't want to change root's password without knowing it).
  5. Samba passes the user's new password to ldapsync.pl without caring about what the old one was.
  6. ldapsync.pl chats with Samba, expecting the correct responses with the new password.
  7. If it passes the chat correctly, the password is encrypted by ldapsync.pl.
  8. ldapsync.pl then binds LDAP with the correct dn of the user and does an ldapmodify on the user's LDAP entry, replacing the userPassword field stored in LDAP. LDAP and Samba chat for a final time, listening for success from LDAP, at which point the process ends.
To configure Samba for this, you will need the following Smb.conf entries:
passwd program = /etc/samba/ldapsync.pl -o %u
passwd chat = *New*password* %n\n
*Retype*new*password* %n\n *modifying*
When users change their passwords in Windows they are prompted for the old password, a new one and then are asked to confirm the new one. Because ldapsync.pl is called without caring about the old password, only the two new entries are examined. First of all, the * instructs it to look for anything and then a specific match. So the *New*password*%n\n is saying match anything, then the word New, then anything and the word password, then anything and the new password the user entered (%n). The *modifying* is saying if LDAP returns that it modified the entry, then the process was successful.
You must edit ldapsync.pl to enter the LDAP bind information:
$binddn = "cn=manager,dc=foo,dc=com";
$passwd = "passwd"; 
Then, limit the access of ldapsync.pl to root only (0700).

Sharing NFS Shares with Samba
Your NFS shares can be shared with Windows clients by running a Samba server on the NFS host. The Samba server must join your FOO SMB domain. Run the following command on the Samba server to join the SMB domain:
smbbpasswd -j [FOO] -r [PDC]
Maintenance
Congratulations! Your LDAP server is up and running with shared e-mail contacts, unified login and shared file storage that is accessible from any client. You probably want to write some administrative utilities to help maintain user and group accounts. Again, we recommend Perl for the task.
Credits
ldapsync.pl originally written by Jody Haynes for Samba-Tng. 

› OpenLDAP Everywhere Reloaded

http://www.linuxjournal.com/content/openldap-everywhere-reloaded-part-i


 Directory services is one of the most interesting and crucial parts of computing today. They provide our account management, basic authentication, address books and a back-end repository for the configuration of many other important applications.
It's been nine long years since Craig Swanson and Matt Lung originally wrote their article "OpenLDAP Everywhere" (LJ, December 2002), and almost six years since their follow-up article "OpenLDAP Everywhere Revisited" (LJ, July 2005).
In this multipart series, I cover how to engineer an OpenLDAP directory service to create a unified login for heterogeneous environments. With current software and a modern approach to server design, the aim is to reduce the number of single points of failure for the directory.
In this article, I describe how to configure two Linux servers to host core network services required for clients to query the directory service. I configure these core services to be highly available through the use of failover pools and/or replication.
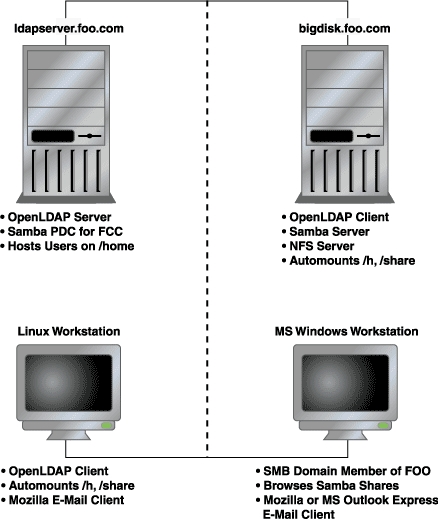
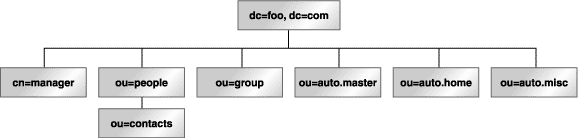
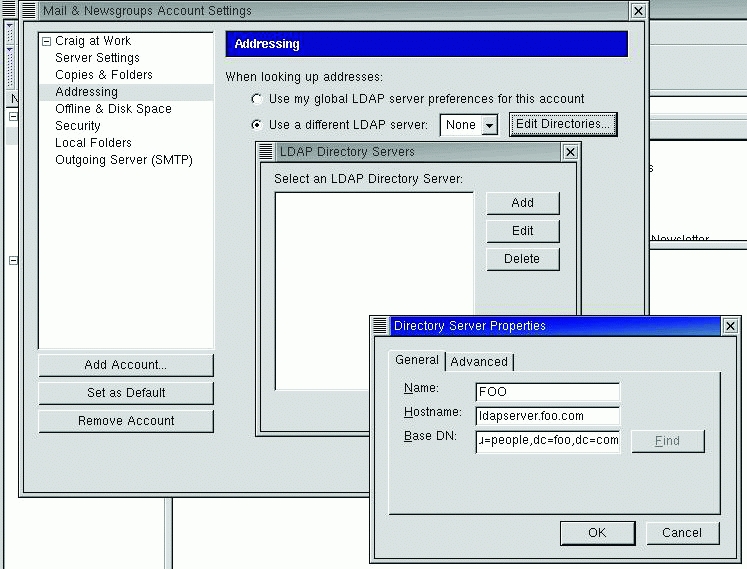
Figure 1. An Overall View of Core Network Services, Including LDAP (Note: the image of the hard disk icon in this figure was taken from the Open Icon Library Project: http://openiconlibrary.sourceforge.net.)

Assumptions and Prerequisites

Certain approaches were taken in this design with small-to-medium enterprises (SMEs) in mind. You may wish to custom-tailor the design if you are a small-to-medium business (SMB) or large-scale enterprise.
The servers discussed in this article were installed with the latest stable version of the Debian GNU/Linux. At the time of this writing, this was Debian 6.0.2.1 (Squeeze). Although it has not been tested for Ubuntu, Ubuntu users should be able to log in as root (run sudo su -) and have few problems.
As per Figure 1, the fictional local domain name is example.com. Four fictitious subnetworks exist: 192.168.1.0/24, 192.168.2.0/24, 192.168.3.0/24 and 192.168.4.0/24. Routing between the four subnets is assumed to be working correctly. Where appropriate, please substitute applicable values for your domain name, IP addresses, netmask addresses and so on.
LDAP users are assumed to have home directories in /export/home rather than /home. This allows LDAP credentials to be compatible for operating systems other than Linux. Many proprietary UNIXes, for example, use /export/home as the default home directory. /home on Solaris is also reserved for other purposes (automount directories).
The design assumes that /export/home is actually a shared disk.
This is typically implemented as a mountpoint to an NFS server on a host or NAS; however, the design makes no determination about how to achieve the shared disk, which is beyond the scope of the article, so I'm leaving it to the reader to decide how to implement this.
You can opt not to implement the shared disk, but there are some serious drawbacks if you don't. All LDAP users will need their $HOME directory to be created manually by the administrator for every server to which they wish to log in (prior to them logging in). Also, the files a user creates on one server will not be available to other servers unless the user copies them to the other server manually. This is a major inconvenience for users and creates a waste of server disk space (and backup tape space) because of the duplication of data.
All example passwords are set to "linuxjournal", and it's assumed you'll replace these with your own sensible values.

Install Packages

On both linux01.example.com and linux02.example.com, use your preferred package manager to install the ntp, bind9, bind9utils, dnsutils, isc-dhcp-server, slapd and ldap-utils packages.

Start with Accurate Timekeeping (NTP)

Accurate timekeeping between the two Linux servers is a requirement for DHCP failover. There are additional benefits in having accurate time, namely:
  • It's required if you intend to implement (or already have implemented) secure authentication with Kerberos.
  • It's required if you intend to have some form of Linux integration with Microsoft Active Directory.
  • It's required if you intend to use N-Way Multi-Master replication in OpenLDAP.
  • It greatly assists in troubleshooting, eliminating the guesswork when comparing logfile timestamps between servers, networking equipment and client devices.
Once ntp is installed on both linux01.example.com and linux02.example.com, you are practically finished. The Debian NTP team creates very sensible defaults for ntp.conf(5). Time sources, such as 0.debian.pool.ntp.org and 1.debian.pool.ntp.org, will work adequately for most scenarios.
If you prefer to use your own time sources, you can modify the lines beginning with server in /etc/ntp.conf. Replace the address with that of your preferred time source(s).
You can check on both servers to see if your ntp configuration is correct with the ntpq(1) command:

root@linux01:~# ntpq -p
remote refid st t when poll reac
h delay offset jitter
====================================================
==========================
+warrane.connect 130.95.179.80 2 u 728 1024 377
74.013 -19.461 111.056
+a.pool.ntp.uq.e 130.102.152.7 2 u 179 1024 377
79.178 -14.069 100.659
*ntp4.riverwillo 223.252.32.9 2 u 749 1024 377
76.930 -13.306 89.628
+c122-108-78-111 121.0.0.42 3 u 206 1024 377
78.818 6.485 72.161
root@linux01:~#

Don't be concerned if your ntpq output shows a different set of servers. The *.pool.ntp.org addresses are DNS round-robin records that balance DNS queries among hundreds of different NTP servers. The important thing is to check that ntp can contact upstream NTP servers.

Name Resolution (DNS)

If the LDAP client can't resolve the hostname of the Linux servers that run OpenLDAP, they can't connect to the directory services they provide. This can include the inability to retrieve basic UNIX account information for authentication, which will prevent user logins.
As such, configure ISC bind to provide DNS zones in a master/slave combination between the two Linux servers. The example workstations will be configured (through DHCP) to query DNS on linux01.example.com, then linux02.example.com if the first query fails.
Note: /etc/bind/named.conf normally is replaced by the package manager when the bind9 package is upgraded. Debian's default named.conf(5) has an include /etc/bind/named.conf.local statement so that site local zone configurations added there are not lost when the bind9 package is upgraded.

 On linux01.example.com, modify /etc/bind/named.conf.local to include the following:

//// excerpt of named.conf.local on linux01

// --- Above output suppressed

zone "168.192.in-addr.arpa" {
type master;
file "/etc/bind/db.168.192.in-addr.arpa";
notify yes;
allow-transfer { 192.168.2.10; }; // linux02
};

zone "example.com" {
type master;
file "/etc/bind/db.example.com";
notify yes;
allow-transfer { 192.168.2.10; }; // linux02
};

// --- Below output suppressed

On linux01.example.com, create the zone files /etc/bind/db.168.192.in-addr.arpa and /etc/bind/db.example.com, and populate them with appropriate zone information. For very basic examples of the zone files, see the example configuration files available on the LJ FTP site (see Resources for the link).
Before committing changes to a production DNS server, always check that no mistakes are present. Failure to do this causes the named(8) dæmon to abort when restarted. You don't want to cause a major outage for production users if there is a trivial error. On linux01.example.com:

# named-checkconf /etc/bind/named.conf
# named-checkconf /etc/bind/named.conf.local
# named-checkzone 168.192.in-addr.arpa /etc/bind/db.
168.192.in-addr.arpa
zone 168.192.in-addr.arpa/IN: loaded serial 20111003
01
OK
# named-checkzone example.com /etc/bind/db.example.c
om
zone example.com/IN: loaded serial 2011100301
OK
#

On linux01.example.com, instruct the named(8) dæmon to reload its configuration files, then check that it didn't abort:

root@linux01:~# /etc/init.d/bind9 reload
Reloading domain name service...: bind9.
root@linux01:~# ps -ef|grep named|grep -v grep
bind 1283 1 0 16:05 ? 00:00:00 /usr
/sbin/named -u bind
root@linux01:~#

It is possible during normal operations that the named(8) dæmon on linux01.example.com could abort and the rest of the server would otherwise continue to function as normal (that is, single service failure, not entire server failure). As linux02.example.com will have a backup copy of the zones anyway, linux01.example.com should use linux02.example.com as its secondary DNS server.
On linux01.example.com, create and/or modify /etc/resolv.conf. Populate it with the following:

search example.com
nameserver 127.0.0.1
nameserver 192.168.2.10

On linux01.example.com, check, and if necessary, modify /etc/nsswitch.conf to include the following "hosts" definition. This line already was in place for me, but it strictly does need to be present for you if it isn't:

## /etc/nsswitch.conf on linux01 & linux02

# --- Above output suppressed

hosts: files dns

# --- Below output suppressed

Finally, test that linux01.example.com can resolve records from the DNS server:

root@linux01:~# dig linux02.example.com +short
192.168.2.10
root@linux01:~# dig -x 192.168.2.10 +short
linux02.example.com.
root@linux01:~# nslookup linux02.example.com
Server: 127.0.0.1
Address: 127.0.0.1#53

Name: linux02.example.com
Address: 192.168.2.10

root@linux01:~# nslookup 192.168.2.10
Server: 127.0.0.1
Address: 127.0.0.1#53

10.2.168.192.in-addr.arpa name = linux01.example.com.

root@linux01:~#

Now, configure linux02.example.com as the slave server. First, modify /etc/bind/named.conf.local to include the following:

//// excerpt of named.conf.local on linux02

// --- Above output suppressed

zone "168.192.in-addr.arpa" {
type slave;
file "/var/lib/bind/db.168.192.in-addr.arpa";
masters { 192.168.1.10; }; // the linux01 server
};

zone "example.com" {
type slave;
file "/var/lib/bind/db.example.com";
masters { 192.168.1.10; }; // the linux01 server
};

// --- Below output suppressed

Take careful note of the placement of the slave zone files in /var/lib/bind, not in /etc/bind!
This change is for two reasons. First, /etc/bind is locked down with restrictive permissions so named(8) is not able to write any files there. named(8) on linux02.example.com cannot and should not write a transferred zone file there.
Second, the /var partition is intentionally designated for files that will grow over time. /var/lib/bind is the Debian chosen directory for named(8) to store such files.
Please resist the urge to change permissions to "fix" /etc/bind! I cannot stress this enough. It not only compromises the security on your RNDC key file, but also the dpkg package manager is likely to revert any change you made on /etc/bind the next time the bind9 package is upgraded.
If you require a single location for both servers to store their zone files, it would be better to move the local zone files on linux01.example.com to /var/lib/bind, rather than force a change to /etc/bind on linux02.example.com. Don't forget to update the paths for the zone files in linux01.example.com's /etc/bind/named.conf.local accordingly.
On linux02.example.com, run named-checkconf(1) to check the new configuration, as you did before for linux01.example.com. If the new configuration checks out, tell named(8) to reload by running the /etc/init.d/bind9 reload command. Also check that the dæmon didn't abort by running ps -ef|grep named|grep -v grep as was done before.
If the zone transfer from linux01.example.com was successful, you should have something like the following appear in /var/log/syslog on linux02.example.com:

# --- above output suppressed ---

Oct 3 20:37:11 linux02 named[1253]: transfer of '168
.192.in-addr.arpa/IN' from 192.168.1.10#53: connected
using 192.168.2.10#35988
--- output suppressed ---
Oct 3 20:37:11 linux02 named[1253]: transfer of '168
.192.in-addr.arpa/IN' from 192.168.1.10#53: Transfer
completed: 1 messages, 12 records, 373 bytes, 0.001
secs (373000 bytes/sec)
--- output suppressed ---
Oct 3 20:37:12 linux02 named[1253]: transfer of 'exa
mple.com/IN' from 192.168.1.10#53: connected using 1
92.168.2.10#41155
--- output suppressed ---
Oct 3 20:37:12 linux02 named[1253]: transfer of 'exa
mple.com/IN' from 192.168.1.10#53: Transfer complete
d: 1 messages, 12 records, 336 bytes, 0.001 secs (33
6000 bytes/sec)

# --- below output suppressed ---

On linux02.example.com, create and/or modify /etc/resolv.conf. Populate it with the following:

search example.com
nameserver 127.0.0.1
nameserver 192.168.1.10

This is the only device on the network that will ever have linux02.example.com as its primary DNS server. It's done for performance reasons, on the assumption that linux01.example.com will fail first. Of course, you never can predict which server will fail first. However, if linux02.example.com happens to fail first, the workstations, in theory, won't notice it—DHCP tells them to query linux01.example.com before linux02.example.com.
Now, on linux02.example.com, check, and if necessary, modify /etc/nsswitch.conf to include the hosts: files dns in the same way performed previously. Check that dig(1) and nslookup(1) can resolve linux01.example.com in a similar manner as done before.

 IP Address Assignment (DHCP)

If your LDAP clients can't receive an IP address to communicate with the network, they can't communicate with the OpenLDAP servers.
As such, configure ISC dhcpd to use failover pools between the two Linux servers. This ensures that IP addresses always are being handed out to clients. It also ensures that the two Linux servers are not allocating the duplicate addresses to the workstations.
The failover protocol for dhcpd is still in development by ISC at the time of this writing, but it is subject to change in the future. It works fairly well most of the time in its current state, and it's an important part of mitigating the risk of server failure for the directory service.
Create a new file on both linux01.example.com and linux02.example.com by running the command touch /etc/dhcp/dhcpd.conf.failover.
Separate the failover-specific configuration from the main /etc/dhcp/dhcpd.conf file. That way, /etc/dhcp/dhcpd.conf can be synchronized between both servers without destroying the unique configuration in the "failover peer" stanza. You never should synchronize /etc/dhcp/dhcpd.conf.failover between the two Linux servers.
On linux01.example.com, populate /etc/dhcp/dhcpd.conf.failover as follows:

failover peer "dhcp-failover" {
primary;
address linux01.example.com;
port 519;
peer address linux02.example.com;
peer port 520;
max-response-delay 60;
max-unacked-updates 10;
load balance max seconds 3;
mclt 3600;
split 128;
}

Notice that the parameters split and mclt are specified only on the primary server linux01.example.com.
max-response-delay controls how many seconds one server will wait for communication from the other before it assumes a failure.
split controls how many IP addresses available in the pool are pre-allocated to each DHCP server. The only valid values are from 0 to 255. As per the example, a split 128; value governs that each server takes 50% of the leases of the entire pool.
On linux02.example.com, populate /etc/dhcp/dhcpd.conf.failover as follows:

failover peer "dhcp-failover" {
secondary;
address linux02.example.com;
port 520;
peer address linux01.example.com;
peer port 519;
max-response-delay 60;
max-unacked-updates 10;
load balance max seconds 3;
}

Note: IANA has not allocated a reserved port number for ISC dhcpd failover at the time of this writing. This means the port/peer port numbers of 519 and 520 are subject to change.
On both linux01.example.com and linux02.example.com, you now should populate /etc/dhcp/dhcpd.conf with appropriate subnet information. For a very basic example of dhcpd.conf, see the example configuration files provided in the Resources section.
The crucial parameters to have in /etc/dhcp/dhcpd.conf are:

# excerpt of dhcpd.conf on linux01 and linux02

#-----------------
# Global DHCP parameters
#-----------------

# --- outputs heavily suppressed ----

#-----------------
# Failover parameters
#-----------------

include "/etc/dhcp/dhcpd.conf.failover";

# --- outputs heavily suppressed ---

subnet 192.168.3.0 netmask 255.255.255.0 {
option routers 192.168.3.1;
option subnet-mask 255.255.255.0;
option broadcast-address 255.255.255.255;
pool {
failover peer "dhcp-failover";
range 192.168.3.20 192.168.3.250;
}
}

subnet 192.168.4.0 netmask 255.255.255.0 {
option routers 192.168.4.1;
option subnet-mask 255.255.255.0;
option broadcast-address 255.255.255.255;
pool {
failover peer "dhcp-failover";
range 192.168.4.20 192.168.4.250;
}
}

These parameters alone are not enough to get a new DHCP server up and running. But, once a working dhcpd.conf is built for your network, add the above parameters for DHCP failover.
Restart dhcpd(8) on both linux01.example.com and linux02.example.com. Do this by running the command /etc/init.d/isc-dhcp-server restart. Check that the dhcpd(8) process did not abort by running ps -ef|grep dhcpd|grep -v grep.
If dhcpd(8) is no longer running, the problem is usually a typo. Re-check in dhcpd.conf and dhcpd.conf.failover that every opening parenthesis (the { character) has a closing parenthesis (the } character). Also check that lines not ending with open/closed parentheses are terminated by a semicolon (;).
Check /var/log/syslog on both servers for messages from dhcpd. When DHCP failover works, both servers should say the pool is "balanced", and that "I move from communications-interrupted to normal" or "I move from startup to normal".
Synchronize /etc/dhcp/dhcpd.conf from linux01.example.com to linux02.example.com every time you modify it. This can be done manually, via an rsync(1) script, via puppetd(8) or via the Network Information Service (though I don't recommend NIS—it's insecure and obsoleted by DNS/LDAP and rsync/puppet).
The drawback to the failover protocol is that it's a long way off from being considered mature. There are plenty of weird situations where the protocol fails to do its job. However, it will not be young forever, and when it does work, it works well. I recommend you monitor your logs and sign up to ISC's dhcp-users mailing list for assistance when things go wrong (see Resources for a link).

 One last note on the DHCP failover protocol: if you have more devices on one subnet than 50% of the overall amount available in the pool range, seriously consider re-engineering your network before implementing DHCP failover.
The protocol inherently relies on having an excess of free addresses to allocate, even after the pool range is cut in half by split 128;.
The maximum amount of available IP addresses for DHCP in a C Class subnet most of the time is 253 (255 addresses, minus 1 address for broadcast, minus 1 address for the router).
If you have more than 126 devices within one failover subnet, either split it into more subnets (for example, one subnet for each floor of the building), or use a larger subnet than C Class. Configure the subnet declaration in /etc/dhcpd.conf to increase its pool range accordingly. It will save you problems later on.
Now that the DHCP servers are configured with failover pools, the final thing to do is configure the 192.168.3.0/24 and 192.168.4.0/24 to forward DHCP client broadcasts through the LAN/WAN to 192.168.1.10 and 192.168.2.10.
This is done on router03.example.com with IP Helper addresses. On linux03.example.com, it's done with ISC's DHCP Relay Agent.
Assume router03.example.com is a Cisco Catalyst Multi-layer Switch. Configure IP Helper addresses by entering privileged mode (run the enable command). Using the ip helper-address command, apply the two DHCP server IP addresses to the router interface that has the 192.168.3.1/24 address. On the Catalyst 3750G in my lab, this is interface "vlan20". The commands are applied like so:

router03#show running-config
Building configuration...

--- output suppressed ---

interface Vlan20
description linuxjournal_vlan
ip address 192.168.3.1 255.255.255.0
end

--- output suppressed ---

router03#configure terminal
router03(config)#interface vlan 20
router03(config-if)#ip helper-address 192.168.1.10
router03(config-if)#ip helper-address 192.168.2.10
router03(config-if)#end
router03#copy running-config startup-config
Destination filename [startup-config]?
Building configuration...
[OK]
0 bytes copied in 8.715 secs (0 bytes/sec)
router03#show running-config interface vlan 20
Building configuration...

Current configuration : 154 bytes
!
interface Vlan20
description linuxjournal_vlan
ip address 192.168.3.1 255.255.255.0
ip helper-address 192.168.1.10
ip helper-address 192.168.2.10
end

router03#

On linux03.example.com, you need to install the isc-debian-relay package. Once it's installed, it will ask for the "multiple server names be provided as a space-separated list". Enter "linux01.example.com linux02.example.com", or if this host isn't configured to resolve from our DNS server pair, "192.168.1.10 192.168.2.10". It will ask on which interface to listen. If you have no preference, leave it blank and press Enter. It will ask you to specify additional options, but you simply can press Enter.
If you make a mistake, you can reconfigure by running the command dpkg-reconfigure isc-dhcp-relay or modify the SERVERS variable in /etc/default/isc-dhcp-relay.
Your DHCP clients now should be able to contact either DHCP server.
In Part II of this series, I'll explain how to configure OpenLDAP on the two Linux servers and start to populate the directory with data.

Resources

Example configuration files for this article: ftp://ftp.linuxjournal.com/pub/lj/listings/issue216/11148.tgz
Debian GNU/Linux: http://www.debian.org/distrib
Download Debian 6.0.2.1: http://cdimage.debian.org/debian-cd/6.0.2.1
Manual Page for ntp.conf(5): http://linux.die.net/man/5/ntp.conf
Manual Page for named.conf(5): http://linux.die.net/man/5/named.conf
Manual Page for dhcpd.conf(5): http://linux.die.net/man/5/dhcpd.conf
Manual Page for dhcp-options(5): http://linux.die.net/man/5/dhcp-options
ISC dhcp-users Mailing List: https://lists.isc.org/mailman/listinfo/dhcp-users
Cisco IOS 12.3 T Command Reference for Idle through IP local-proxy-arp (includes ip helper-address): http://www.cisco.com/en/US/docs/ios/12_3t/ip_addr/command/reference/ip1_i1gt.html

لماذا شفيق؟


     فيديو لازم تشوفه قبل انتخابات الاعادة - شفيق أمام مرسي


عصام سلطان يفضح علاقة شفيق بأسرة مبارك

http://www.youtube.com/watch?feature=player_embedded&v=x49I1iEHRKg   

شفيق - مبارك مثلى الاعلى لحد آخر يوم ف حياتى.
http://www.youtube.com/watch?v=Vr5XQEUG9K4


شفيق - الجمال والاحصنة راحوا التحرير عشان يرقصوا
http://www.youtube.com/watch?v=bpqyPB52YXc


شفيق يقول : - للأسف الثورة نجحت .
http://www.youtube.com/watch?v=XfS4Rv9JdHc


شفيق يهدد معارضيه- ومعاه تقارير عنهم من امن الدولة
http://www.youtube.com/watch?v=V4dgdlt-xQA


شفيق - لو الشعب نزل التحرير هخلى الجيش يتصرف
http://www.youtube.com/watch?v=JV4EToSyD6Y


شفيق - لن اطبق الشريعة ابداً لا دلوقتى ولا أَدام
http://www.youtube.com/watch?v=UvasLcHWfz0


شفيق : لا نقول على اليهود اعدائنا باى حال من الاحوال
http://www.youtube.com/watch?v=-9YTSE34jW0


عمرو موسى - اطالب شفيق ( وزير معركة الجمل ) بالتنازل .
http://www.youtube.com/watch?v=ebpL-MmLPoE


شفيق اثناء الثورة - اكثر من 90 % من مطالب الثورة تحققت
http://www.youtube.com/watch?v=9Xh_eKNKKdk


شفيق ف الثورة يتبع سياسة فرق تسد بين الاخوان والشباب
http://www.youtube.com/watch?v=fynM57FIZJ8


شفيق ف الثورة - الاخوان بيحشدوا للميدان ولا جدوى لذلك
http://www.youtube.com/watch?v=I-dORNRxALo


ارتباك شديد لشفيق عند اجابته على هذا السؤال؟؟؟
http://www.youtube.com/watch?v=VQIUoYD-m00


بعد التهرب كثيرا من السؤال - شفيق يعترف ويقول بدون قصد
http://www.youtube.com/watch?v=PF35p6S6xOI


محتار بين مرسي وشفيق!!
وبتقول ان الاخوان هايعملوا حزب وطني جديد

ماينفعشي تختار حاجة متأكد انها وحشة وتسيب حاجة عندك شك فيها انها ممكن تكون وحشة


مش عاوزين نعيد نفس السيناريو دا


فكر واختار اقل الضررين


ولو عاوز تمشي ورا الاعلام(اللي انت متأكد انه ضلالي) فدي هاتبقى مشكلتك
____
 فكر


قارن


عاوز النظام يتنيه زي ماهو بشوية تحسينات؟ ولا نبدأ نبني الدولة


هاتختار دا ؟


شوف الناس اختارت مين ليه


حد يبقى يعمل فوروارد للناس الصينيين علشان مش عارف ايميلاتهم